
Using the Mouse to Edit in Excel.
| Position | Icon | Function |
| Center | Select | |
| Border | Drag/Drop | |
| Lower Right | Fill |
Does Excel sometimes seem to have a mind of its own? You want to highlight cells and all of a sudden their contents move. Welcome to Excel’s useful, but sometimes frustrating “autofill” and “drag-and-drop” features.
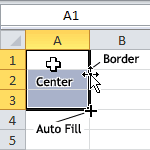
The secret is to know that there are three different icons that can appear as you move your mouse over a worksheet. Once you understand what each means and how to get the one you want, you are in control. The icons and their related actions are shown above.
Mouse position determines which icon appears and thus what mode you are in. The drawing at the left shows the positions and icons.
Select Cells. To select cells, perhaps to format or copy them, just put your mouse anywhere on the center of a cell. The thick white cross icon appears. Press the mouse button while you drag the mouse across the cells you want to select. Release the mouse button and the cells are selected.
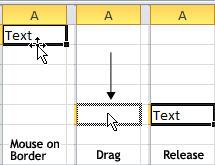
Move or Copy Cell Contents. Drag-and-drop lets you move or copy cell contents with the mouse instead of Cut/Copy and Paste. To do this, put the mouse anywhere on the border of a selection except the lower right corner. The mouse icon turns into a pointer. Press the mouse button and drag the mouse to where you want to move the contents. Release the mouse button and the selected contents are moved.
Tip. If you press and hold the “Control” (PC) or “Command” (Mac) key while dragging, you copy the selected contents rather than move them. Be sure you release the mouse button before you release the “Control” or “Command” key.
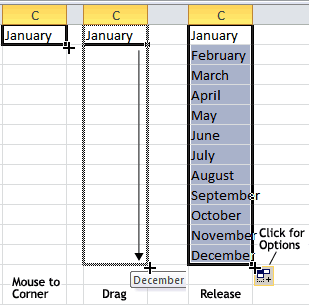
Auto Fill. Auto fill lets you fill cells with a series by moving the mouse. Simply enter the item you want to copy, move the mouse to the auto fill handle (lower right corner), drag the mouse across the cells you want to fill, and the series appears when you release the mouse.
For text and numbers the series simply copies the entry you begin with. But if that entry is a date, such as the month January in the example on the right, it automatically is incremented. For dates the series advances forward (e.g., January, February …) if you move the mouse down or to the right; backward if you move it up or to the left.
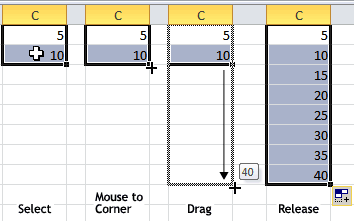
To create a custom number or date series, simply enter the first two values and select them. Excel treats them as a sample of the series you want. For example, to create a series 5, 10, 15 …, enter 5 and 10 in adjoining cells, select them and then AutoFill. For a custom date series, enter the first two dates. Thus the sample 8/5/2013 and 8/12/2013 creates a series continuing 8/19/2013, 8/26/2013 ….
Turn It Off. If you don’t like these features it is easy to turn them off. Just go to “Options” (“Preferences” on a Mac), locate “Editing” and remove the check mark next to “Enable fill handle and cell drag-and-drop.”
These mouse shortcuts are covered in our Mastering Excel class.
Visit our Excel Productivity Guides page for more helpful articles.
This article originally appeared in our free twice-monthly e-mail newsletter. To receive future issues, please add your name to the subscription list.
Free NewsletterWant to learn more? We offer seven different Excel classes: Mastering Excel, Advanced Excel, Excel Charts, Excel Dashboards, Macros and Pivot Tables and Power Pivot. Click any class name for a detailed description.
Class ScheduleWe can also create a private Personalized Excel Class for your group, or provide individual training or project consulting services.